Saturday, June 1, 2019

9 Holiday Characters From Around The World!

Jejak PandaHai.. Bertemu Lagi Di Website Kesayangan Anda
situs bandarq


    Most American four-year-olds can tell you all about beloved Christmas characters like Santa Claus and Frosty the Snowman. But in other countries, talking about Rudolph and his ilk might earn you little more than a blank stare. Here’s a look at some holiday characters who might not be familiar to Americans, but play a big role in celebrations around the world.


1. Zwarte Piet


olds can tell you all about beloved Christmas characters like Santa Claus and Frosty the S 9 HOLIDAY CHARACTERS FROM AROUND THE WORLD!


   The Dutch equivalent of Santa, Sinterklaas, rolls into town via steamship from his home in Spain, and he’s always got Zwarte Piet (“Black Pete”) in tow. Although for years Black Pete was depicted as Santa’s slave, since the 1950s he’s been toned down a bit and is now thought of as Santa’s mischievous helper—a scamp who will also put naughty children in a bag and take them back to Spain. Despite being recast as Santa’s friend or devoted, albeit non-slave, servant, Black Pete still incites quite a bit of controversy, as many Dutch people feel that a subservient character in blackface and an afro wig is more than a little racist.


2. Krampus


olds can tell you all about beloved Christmas characters like Santa Claus and Frosty the S 9 HOLIDAY CHARACTERS FROM AROUND THE WORLD!


   This terrifying horned monster is part of the Christmas tradition in Austria and other surrounding countries. If children are good, Saint Nicholas brings them toys. If they’re bad, though, they’ve got to face Krampus’ wrath. The clawed, hairy beast is said to punish naughty children by stealing their toys, smacking them with a birch rod, and even tying them in a sack and chucking them into a river. Getting a lump of coal in your stocking doesn’t seem like such a terrible fate in comparison, does it?


3. Belsnickel


   In northwestern Germany and in some Pennsylvania Dutch communities, children get visits from the somewhat less intimidating Belsnickel instead of Krampus. Belsnickel, a man covered in head-to-toe fur, sneaks a sock or shoe full of candy into children’s rooms. Like Krampus, though, Belsnickel will put his foot down; if the children have been naughty, they’ll wake up to a shoe full of coal or switches.


4. Le Pere Fouettard


   Le Pere Fouettard is another of Saint Nicholas’ enforcers, this time in Eastern France. This bearded, black-robed character carries either a whip or a rod, and while St. Nick hands out toys to the good children, Le Pere Fouettard is said to beat the naughty ones. Even though he may not be as visually terrifying as Krampus, some origin stories for Le Pere Fouettard are pretty grisly. He’s said to be the murderer of three boys who’s now stuck working for St. Nick to atone for his sins.


5. Gryla


olds can tell you all about beloved Christmas characters like Santa Claus and Frosty the S 9 HOLIDAY CHARACTERS FROM AROUND THE WORLD!


   Naughty children in Iceland have to fear being caught by Gryla, an ogress who lives in a mountain cave but comes out each year to plague bad kids during Christmas. During the 18th century, Gryla was such a terrifying figure—her mythology at the time included eating the bad children, not just scaring them—that a public decree banned the use of Gryla to strike terror in the hearts of the poorly behaved.


6. Ded Moroz


olds can tell you all about beloved Christmas characters like Santa Claus and Frosty the S 9 HOLIDAY CHARACTERS FROM AROUND THE WORLD!


   Ded Moroz (“Grandfather Frost”) is the Slavic equivalent of Santa Claus, but he acts just a bit differently from the St. Nick Americans are used to. Ded Moroz carries a magical staff everywhere, and instead of sneaking down chimneys to deposit gifts before disappearing into the night, he actually shows up at New Year parties to give kids their gifts
   Ded Moroz had a tough time in the Soviet Union. Between the Russian Revolution and 1937, he didn’t come at all due to a ban on Christmas-like New Year’s traditions. When Joseph Stalin came into power, he ordered that Ded Moroz wear a blue coat so that no one would confuse him with the Western Santa Claus.
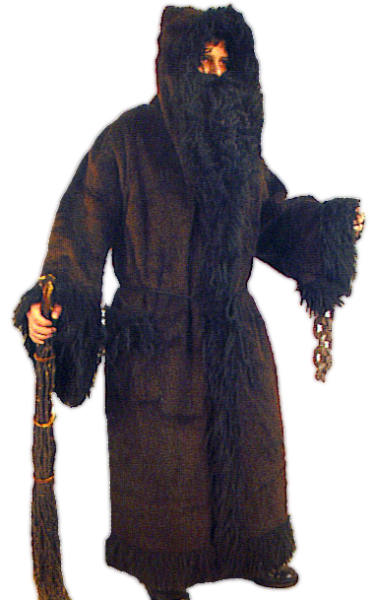


7. La Befana


   Children in Italy don’t have to worry about Santa, but they definitely want to remain on the good side of Befana. On January 6th each year, Italian kids wake up with the hope that Befana, a shawl-wearing old lady who rides a broomstick, will have come down their chimneys to leave a sock full of candy rather than a lump of coal.


8. Olentzero


   In Basque communities, Olentzero comes to town on Christmas Eve to deliver children’s holiday gifts. Although Olentzero—an overweight man who wears a beret, smokes a pipe, and dresses like a Basque farmer—is now a beloved character who comes bearing gifts, he used to have some violent enforcer-type aspects to his personality; children heard that if they didn’t go to sleep, Olentzero would hurl a sickle down the chimney. The message was clear: go to sleep or Olentzero will come cut your throat.


9. Tio de Nadal


olds can tell you all about beloved Christmas characters like Santa Claus and Frosty the S 9 HOLIDAY CHARACTERS FROM AROUND THE WORLD!


   Tio de Nadal is a Catalan character that’s also known as “Caga tio,” or “pooping log.” Starting with the Feast of the Immaculate Conception on December 8th, Catalan families host a tio, which is a small hollow log propped up on two legs with a smiling face painted on one end. Each night the family gives the log a few morsels of food to “eat” and a blanket so it will “stay warm” throughout the evening.   On Christmas or Christmas Eve, the family then orders the hollow log to “defecate” small gifts. Family members sing songs and hit the log with sticks in order to speed its “digestion,” and the log gradually drops candies, nuts, and dried fruits that the family shares. When a head of garlic or an onion falls out of the log, all of the treats are finished for the year.

Sunday, May 26, 2019

History Of Christmas Crackers!

Jejak PandaHai.. Bertemu Lagi Di Website Kesayangan Anda
situs bandarq
   The childhood magic of anticipation comes rushing back with one of these treasures packs of promise! 

   Christmas crackers or bon-bons are an integral part of Christmas celebrations in the United Kingdom and Commonwealth countries such as Australia, Canada, New Zealand and South Africa. They are also popular in Ireland. A cracker consists of a cardboard tube wrapped in a brightly decorated twist of paper, making it resemble an oversized sweet-wrapper. The cracker is pulled by two people, and, much in the manner of a wishbone, the cracker splits unevenly. The split is accompanied by a small bang or snapping sound produced by the effect of friction on a chemically impregnated card strip (similar to that used in a cap gun).
   Crackers are typically pulled at the Christmas dinner table or at parties. In one version of the cracker tradition, the person with the larger portion of cracker empties the contents from the tube and keeps them. In another each person will have their own cracker and will keep its contents regardless of whose end they were in. Typically these contents are a coloured paper hat or crown; a small toy, small plastic model or other trinket and a motto, a joke or piece of trivia on a small strip of paper.


   Assembled crackers are typically sold in boxes of three to twelve. These typically have different designs usually with red, green and gold colors. Making crackers from scratch using the tubes from used toilet rolls and tissue paper is a common Commonwealth activity for children. Kits to make crackers can also be purchased.
   Crackers are also a part of New Year celebrations in Russia (where they are called Ñ…лопушка - khlopushka) and some countries of the former Soviet Union. Those are however more similar to pyrotechnical devices, normally used outdoors, activated by one person, and produce a stronger bang accompanied by fire and smoke.

 History

The Oxford English Dictionary records the use of cracker bonbons and the pulling of crackers from the early 1840s.  Tradition tells of how Thomas J. Smith of London invented crackers in 1847.   He created the crackers as a development of his bon-bon sweets, which he sold in a twist of paper (the origins of the traditional sweet-wrapper). As sales of bon-bons slumped, Smith began to come up with new promotional ideas. His first tactic was to insert mottos into the wrappers of the sweets ( fortune cookies), but this had only limited success.
   Smith added the "crackle" element when he heard the crackle of a log he had just put on a fire. The size of the paper wrapper had to be increased to incorporate the banger mechanism, and the sweet itself was eventually dropped, to be replaced by a small gift. The new product was initially marketed as the Cosaque (i.e., Cossack), but the onomatopoeic "cracker" soon became the commonly used name, as rival varieties came on the market. The other elements of the modern cracker, the gifts, paper hats and varied designs, were all introduced by Tom Smith's son, Walter Smith, to differentiate his product from the rival cracker manufacturers which had suddenly sprung up.


   However, the OED may well be in error as they appear to have been available in France in 1817. Lt. Colonel Felton Hervey states in a letter dated 7 November 1817 The night before last Arthur Hill desired me to give a letter to the Duchess of R[ichmon]d, which I did very innocently. It contained one of these crackers, called Cossacks, which are sold in the fair here. It went off, and the duchess also, into one of the most violent fits of laughing hysterics ever witnessed. I am happy to say she does not think me guilty. I wonder it did not kill the old woman.


A Little Video on How To Make Christmas Crackers


Monday, May 20, 2019

Plum Pudding, A Traditional English Dessert For The Holidays!

Jejak PandaHai.. Bertemu Lagi Di Website Kesayangan Anda
situs bandarq


    Plum pudding or Christmas pudding, as it is more popularly known, has its origins in England. It is often served about Christmas time, or usually around Advent time. It has been a family tradition in many homes to have a "stir up Sunday", when each child is allowed to stir the pudding and make a wish.


What is Plum Pudding?

    It's almost black color comes from the heavy dried fruits that are used to make it. Traditionally, plum puddings are boiled or steamed using a pudding cloth and would sometimes have charms mixed inside them. The charms may either be a silver coin, a silver thimble, anchor or ring which all stand for good things in life such as good luck, wealth, a happy marriage and a safe trip.
    A plum pudding does not really have plums in it, but it is full of dried fruits and nuts,mixed with beef suet and citrus fruit juices or alcohol such as beer, rum or brandy. It is often dried out before it is served, as the longer it is allowed to dry, the stronger the flavor becomes. When it is ready to be served, it is steamed and some more alcohol or juice is spread on it to bring out a strong aroma. it may be served with a sprig of holly on top, some custard or cream, and is often decorated with caster sugar on top that somewhat resembles snow flakes.
    Historically speaking, plum puddings probably originated in England during the Victorian period, around 1420. It was first prepared and served not as a dessert, but as a way to preserve meats and make them last all throughout periods when meats are not readily available. The various dried fruits were used as preservatives. During the reign of Elizabeth I, prunes were used and the name "plum pudding" evolved.
    It was only during the mid 1800's that the dish became more popular as a food often served during the Christmas season. These days, ready made puddings are available in stores, specialty shops and supermarkets. Although home made plum puddings are still preferred as perfect gifts for relatives and friends during the Christmas season, ready made cooked puddings are just as good, without going through many hours of preparation.


PLUM PUDDING RECIPE


Total Time:
4 hr 30 min
Prep
30 min
Cook
4 hr 0 min

Yield:
approximately 10 to 12 serving
Level:
Easy


Ingredients

  • 1 cup flour
  • 1/2 teaspoon each salt, baking soda, nutmeg, cinnamon, cloves, and allspice
  • 1 cup soft bread crumbs
  • 1 cup chopped suet
  • 1 cup prune pulp
  • 1/2 cup brown sugar
  • 1 cup uncooked chopped prunes
  • 1/4 cup candied lemon peel, finely chopped
  • 1/4 cup molasses
  • 3 eggs, separated
  • Hard Sauce, recipe follows

Directions

Sift together the flour, salt, baking soda and spices. Mix together the rest of the ingredients, except the egg whites, adding just the yolks. Whip the egg whites until stiff and fold into the batter. Grease a pudding mold dredged with sugar and pour in batter. Cover the mold with its lid or cover tightly with foil. Steam for 3 to 4 hours, depending on the size of your mold. Serve hot with hard sauce. If you are not serving the pudding immediately, store in the refrigerator soaking in 1 ounce of brandy. Add 1 ounce each week.
Serve with warmed Hard Sauce.

Hard sauce:

  • 1/4 cup butter
  • 1 cup powdered sugar
  • 1 tablespoon dark rum
  • 1/2 teaspoon vanilla extract
Cream the butter in an electric mixer until pale in color. Add the sugar and mix well. Add the flavorings and mix in then adjust, to taste.

Ingredients

  • cup flour
  • 1/2 teaspoon each salt, baking soda, nutmeg, cinnamon, cloves, and allspice
  • 1 cup soft bread crumbs
  • 1 cup chopped suet
  • 1 cup prune pulp
  • 1/2 cup brown sugar
  • 1 cup uncooked chopped prunes
  • 1/4 cup candied lemon peel, finely chopped
  • 1/4 cup molasses
  • 3 eggs, separated
  • Hard Sauce, recipe follows

Directions

Sift together the flour, salt, baking soda and spices. Mix together the rest of the ingredients, except the egg whites, adding just the yolks. Whip the egg whites until stiff and fold into the batter. Grease a pudding mold dredged with sugar and pour in batter. Cover the mold with its lid or cover tightly with foil. Steam for 3 to 4 hours, depending on the size of your mold. Serve hot with hard sauce. If you are not serving the pudding immediately, store in the refrigerator soaking in 1 ounce of brandy. Add 1 ounce each week.
Serve with warmed Hard Sauce.

Hard sauce:

  • 1/4 cup butter
  • 1 cup powdered sugar
  • 1 tablespoon dark rum
  • 1/2 teaspoon vanilla extract

Cream the butter in an electric mixer until pale in color. Add the sugar and mix well. Add the flavorings and mix in then adjust, to taste.

Tuesday, May 14, 2019

December Food Holidays!

Jejak PandaHai.. Bertemu Lagi Di Website Kesayangan Anda
situs bandarq


   December is a time to celebrate our faith, be with our family, and enjoy great food. But, there are more food holidays in this month than you might think. Actually there is a national food holiday for everyday of the year. In this article, you'll not only find out which food holidays are in December, but you'll also find suggestions on how to celebrate each holiday.


National Pie Day December 1: Pies are so easy to make, especially if you start out with store bought pie crusts. Just make a quick filling, bake, and enjoy.

National Fritters Day December 2: Try a nice apple fritter for breakfast with a big cup of coffee.

National Apple Pie Day December 3: Apple pies are so easy to make, but since you just made a homemade pie, why not pick up a Mrs. Smith's pie? Just bake and add a big scoop of vanilla ice cream.

National Cookie Day December 4: This is definitely the time to bake cookies. Get out your favorite recipe and make a large batch for friends and family.


 December is a time to celebrate our faith DECEMBER FOOD HOLIDAYS!


National Sacher Torte Day December 5: Sacher Torte is a chocolate cake that was invented in the 1800s. You can find many recipes online or you can just bake a regular chocolate cake instead.

Microwave Oven Day December 6: For this food holiday, do something fun and find a recipe for candy that can be made in the microwave.

National Cotton Candy Day December 7: This is another food holiday that can be really fun. Spend the day at a local theme park, which happens to be one of the best places to find cotton candy.

National Chocolate Brownie Day December 8: On this food holiday, do something easy yet decadent by jazzing up a store bought brownie mix.

National Pastry Day December 9: Visit your favorite bakery on this fine food holiday and stock up on all your favorite goodies.


National Lager Day December 10: Head to a nice pub and enjoy a delicious lager with meat and potatoes.

National Noodle Ring Day December 11: There are several variations of this dish. Just go online and find a recipe that sounds great to you.

National Cocoa Day December 12: Is there anything better on a cold winter night than curling up with a blanket, your sweetie, and a hot cup of cocoa?

Ice Cream and Violins Day December 13: I'm not exactly sure how this food holiday started, but does anyone really need a reason to enjoy ice cream?

National Bouillabaisse Day December 14: Enjoy a hearty fish stew on this food holiday.


National Cupcake Day December 15: This is another great food holiday. Just make your favorite cupcakes and enjoy.

National Chocolate Covered Anything Day December 16: Go all out of this food holiday and make your favorite candy, chocolate covered cheesecake, and even chocolate covered pretzels.

National Maple Syrup Day December 17: Enjoy a delicious stack of pancakes on this food holiday.

National Roast Suckling Pig Day December 18: I'm not sure who actually has time to roast a whole pig, especially during the holiday season. For this food holiday, just serve pork chops or a nice ham instead.

National Hard Candy Day December 19: It's almost Christmas, enjoy a nice candy cane.


National Fried Shrimp Day December 20: Head out to your favorite seafood restaurant and enjoy jumbo fried shrimp.

National Hamburger Day December 21: On this food holiday, go all out and make gourmet hamburgers. Stuff them with blue cheese and top them with pepper bacon, slices of avocado, and flavored mayonnaise.

National Date Nut Bread Day December 22: Date nut bread is delicious served with sweetened cream cheese.

National Pfeffernuesse Day December 23: These are a heavily spiced cookie. If you wanted to, you could make gingerbread men cookies instead.

National Eggnog Day December 24: On this food holiday, serve up a big mug of eggnog topped with whipped cream and cinnamon.


National Pumpkin Pie Day December 25: Enjoy a nice pumpkin pie with your holiday feast.

National Candy Cane Day December 26: After all the Christmas activities are done, sit back and enjoy a nice candy cane.

National Fruit Cake Day December 27: If you like fruit cake, enjoy a nice slice. If not, enjoy another type of cake instead.

National Chocolate Candy Day December 28: Go to your local department store and stock up on all the boxes of leftover Christmas candy.

Pepper Pot Day December 29: This is a Jamaican soup and the recipe can be found online. This is a great recipe to make if you're tired of the cold weather.


National Bicarbonate of Soda Day December 30: Put your baking soda to use and make some delicious baked goods.

National Champagne Day December 31: Ring in the New Year with a nice glass of champagne or sparkling cider if you don't drink alcohol.

Wednesday, May 8, 2019

Christmas Tree Mobile How To!

Jejak PandaHai.. Bertemu Lagi Di Website Kesayangan Anda
situs bandarq
  This comes form www.notmartha.org .  This looks retro for someone who like a non traditional christmas tree.

Christmas tree ornament mobile, how-to


 This looks retro for someone who like a non traditional christmas tree CHRISTMAS TREE MOBILE HOW TO!
 This looks retro for someone who like a non traditional christmas tree CHRISTMAS TREE MOBILE HOW TO!


Here is how I made my Christmas tree ornament mobile, it was easier than it looks, promise.

The Supplies


 This looks retro for someone who like a non traditional christmas tree CHRISTMAS TREE MOBILE HOW TO!


  • a 17″ steamer rack from a restaurant supply store
  • about 5 feet of lightweight jack chain
  • a small carabiner
  • 100 basic ornament hooks
  • one roll, 500 feet, monofilament jewelry string (not the stretchy sort)
  • 200 jewelry crimp beads or tubes
  • jewelry crimping tool
  • 100 lanyard hooks
  • 100 ornaments


Note: In the photo above I show earring wire instead of ornament hooks. I changed that later as I found ornament hooks made it far easier to move ornaments around after they’d been hung. Also, my supplies are based on a 4 foot tall mobile using almost 100 ornaments, you’ll need to adjust amounts if you make one larger or smaller.


Creating the Mobile Frame

Creating the frame for my ornament tree mobile turned out to be fairly simple. I used a lot of hooks to allow for easy adjustment and additions as the mobile was being assembled. I gathered materials from a restaurant supply store, a hardware store and the jewelry section of a craft store.


 This looks retro for someone who like a non traditional christmas tree CHRISTMAS TREE MOBILE HOW TO!


For the top of the mobile I needed something that would allow me to easily secure a lot of hanging points without them sliding around too much. The perfect thing turned out to be a 17-inch steamer rack bought for about $6 from a restaurant supply store (I found mine at Encore Restaurant Equipment in the SODO neighborhood of Seattle). The rack comes with folding feet attached that were easy to pop out with a little bending.


 This looks retro for someone who like a non traditional christmas tree CHRISTMAS TREE MOBILE HOW TO!


Turn the rack upside down and the spots where the legs were secured neatly become four hanging points.


 This looks retro for someone who like a non traditional christmas tree CHRISTMAS TREE MOBILE HOW TO!


I bought some inexpensive jack chain to use for hanging. You can open and close the links in the chain with needle nose pliers so there isn’t any need for heavy duty wire cutters. I separated four lengths of chain, attached them to the points using lanyard hooks found in the jewelry supply section of a craft store.


 This looks retro for someone who like a non traditional christmas tree CHRISTMAS TREE MOBILE HOW TO!


I joined the chains using another lanyard hook, and put that on a little carabiner which hung from the hook in the ceiling.


 This looks retro for someone who like a non traditional christmas tree CHRISTMAS TREE MOBILE HOW TO!


Notes: Why so many hooks and bits? Because it makes it is simple to adjust and shorten the chain and can later be disassembled and reassembled with very little effort and without needing tools. I kept the same thing in mind when creating the lines that the ornaments were suspended from. This added a bit of visual clutter but made the entire thing mobile easy to adjust and reuse in another year.

Suspending the Ornaments


 This looks retro for someone who like a non traditional christmas tree CHRISTMAS TREE MOBILE HOW TO!


I used jewelry monofilament secured with crimp tubes to hold the ornaments. I simply created loops at both ends. I made a bunch of different lengths (details on that below). I secured each line to points in the rack grid using lanyard hooks, and hung a basic wire ornament hook at the bottom ends. The lanyard hooks at the top are strong enough to hold heavier ornaments, and because they close they won’t fall off if the mobile is bumped. The basic ornament hooks allow one to easily move ornaments around from one spot to another. My tip to you: Keep the lines as separate as possible while you’re working with them. I spent more time untangling clear threads than doing anything else on this project. It was maddening. After I discovered just how maddening I started hanging them in groups by length from a curtain rod and weighing them down with an ornament to keep them separated, doing this made the hanging of the ornaments go quickly.
Notes: The use of ornament hooks allows for ornaments to easily be moved around. It does add visual clutter, though. If you want to create a mobile that would only be used once securing the monofilament line directly to the ornaments would look much tidier. I initially planned to use earring wire hooks that closed to hang the ornaments but quickly found that they were frustrating to fiddle with every time I wanted to move an ornament from one spot to another. They were prettier, though, and because those close as well would hold ornaments more securely if the mobile is moved around. (Which I don’t suggest as it tangles the lines horribly. So horribly.) Crimp tools come in three sizes Micro, Regular and Mighty (large). I used the regular size. I did try to use nylon sewing thread but found that the crimps didn’t secure it well enough. I did consider using nylon sewing thread with micro crimp beads and the micro crimping tool but think one would need a lot of patience and really great lighting to get all that done. The monofilament jewelry string is pretty stiff and easy to work with.

Determining Placement and Lengths


 This looks retro for someone who like a non traditional christmas tree CHRISTMAS TREE MOBILE HOW TO!


Figuring out where to put the hanging points on the rack involved a bit of math, most all of which I abandoned. I’ll do my best to describe what I did.
I decided to create rings on the rack, with the longer threads hanging on the outside rings to create the cone tree shape. Actually it creates tiers, think a tall skinny wedding cake. I figured that my ornaments were usually about 2 or 3 inches in diameter so I needed to space the rings a little more than 1 inch apart so that the ornaments would have room to hang without being crowded by the longer threads around them. I spaced the rings about 1.5 inches apart. This gave me a center point and 6 rings to work with, with the last ring being the outer edge of the rack, like so:


 This looks retro for someone who like a non traditional christmas tree CHRISTMAS TREE MOBILE HOW TO!


I determined I wanted my tree to be about four feet in total height from the top ornament to the bottom. I made the first ornament, the center point, hang 3.5 inches, and added length from there. For my needs, each set of string needed to be 1.75 inches longer than the last. Each ring on the hanging rack held for different lengths of string. I added 2 inches to the length of string I actually cut to allow for the loops.
To figure out how many ornaments per ring I, well, completely made it up. I decided the first ring should hold seven ornaments and went up by four from there. So the number of ornaments went: 1, 7, 11, 15, 19, 23, 27. I divided the four lengths of string between those, giving the longest length more ornaments to help the triangle effect. Whew. So I cut this many at these lengths for these rings:


  • For the Center Point: 5.5″
  • For Ring 1: one at 7.25″, one at 9.0″, two at 10.75″, three at 12.5″
  • For Ring 2: two at 14.25″, two at 16.0″, three at 17.75″, four at 19.5″
  • For Ring 3: three at 21.25″, three at 23.0″, four at 24.75″, five at 26.5″
  • For Ring 4: four at 28.25″, four at 30.0″, five at 31.75″, six at 33.5″
  • For Ring 5: five at 35.25″, five at 37.0″, six at 38.75″, seven at 40.5″
  • For Ring 6: six at 42.25″, six at 44.0″, seven at 45.75″, eight at 47.5″


 This looks retro for someone who like a non traditional christmas tree CHRISTMAS TREE MOBILE HOW TO!


In order to make the measuring a cutting go as quickly as possible I taped a cloth measuring tape to a tabletop and marked each length with the number I needed to cut with sticky notes. So all it took was to stretch some string out and clip at the needed point. Keep these in groups at this point forward, it will make it far easier later. I looped and crimped the ends, then hung them in groups on a curtain rod weighted down by an ornament.


 This looks retro for someone who like a non traditional christmas tree CHRISTMAS TREE MOBILE HOW TO!


To figure out where my rings would fall on the rack I tied a cotton string to my center point and marked it at 1.5 inch intervals. Then I swung the string around and put as many hooks as I needed on each given ring. I usually put them on the X and Y axis first, then filled in the quadrants. It went faster than it sounds, promise. I spaced the hooks, aka the hanging points, like so:


 This looks retro for someone who like a non traditional christmas tree CHRISTMAS TREE MOBILE HOW TO!


Looking up at the mobile from below you can sort of see the rings emerging:


 This looks retro for someone who like a non traditional christmas tree CHRISTMAS TREE MOBILE HOW TO!


And after this I attached a hook into my ceiling and hung the rack. I found the best way to hang everything is to work from the center out, hang each set of lengths of monofilament string spacing it around it’s designated ring as evenly as possible, then hang ornaments before moving on to the next set of lengths of string. By weighing the strings down as you go along it will help them from getting tangled as you work. You can add or move string, and move ornaments around if needed. I didn’t worry too much about getting everything just perfect and I think it worked to my advantage, the slightly controlled randomness gives it a nicely organic look. At least I hope so.


 This looks retro for someone who like a non traditional christmas tree CHRISTMAS TREE MOBILE HOW TO!


If I were to do it again I would make my tree taller and more dramatic. I think I would try to squeeze in one more ring and stagger the ornaments with even more lengths of string, maybe in increments by the inch. As it was I found that there are lots of spots where two of the same length are side by side. If I had more money to devote I would buy glass ornaments that don’t have a metal cap, just a glass loop at the top, and would skip the ornament hooks to make it look tidier.


 This looks retro for someone who like a non traditional christmas tree CHRISTMAS TREE MOBILE HOW TO!


I’m growing more and more fond of the mobile with clear glass ornaments.


update:
Here is a photo of the mobile taken apart and ready for storage, the ornament hooks in a bag and each set of lengths of string committed to it’s own numbered envelope. The envelopes were orphans from previous years of Christmas cards that I had saved (reuse!). I left the hanging hooks on the rack so when I return to put it up again next year it will be very quick and easy.


Thursday, May 2, 2019

Diy Glittered Xmas Cards With Fold In Shapes And A Holly Card!

Jejak PandaHai.. Bertemu Lagi Di Website Kesayangan Anda
situs bandarq
   This comes from www.marthastewart.com .  Make these early enought and send them not just for xmas cards but also, possibly an xmas party.  When someone gets one of these, it won't get thrown away, it will be shown and talked about for the holiday season. Enjoy!
   The art of handmade holiday cards is a treasure for the creator and recipient alike. This season, try your hand at one of our many holiday-card craft ideas. Whether the sentiment is embossed, decked in ribbon, or encasing a prized photograph, the extra time will be well worth it when your cards are opened.
With a few basic techniques, you can create a wide range of looks by varying shapes, color, and decorative details. These snowman and snowflake pop-ups are decorated with glitter and glue, and inscribed with a fountain pen dipped in red ink.


Tools and Materials
  • Templates, enlarged to desired size
  • Fountain pen
  • Red ink
  • Card stock
  • Utility knife
  • Glue
  • Glitter
  • Ribbon, optional

  • Introduction


    With a few basic techniques, you can create a wide range of looks by varying shapes, color, and decorative details. These snowman and snowflake pop-ups are decorated with glitter and glue, and inscribed with a fountain pen dipped in red ink.
    Step 1
  • Cut Out Figures

    For the snowflake and snowman, trace template onto folded card stock, centering the image over the fold. Cut along shape with a utility knife, leaving it attached at the tabs. For the gift card, cut two parallel horizontal lines equidistant from the center fold on card stock.


Step 2

Complete the Card

For all cards, push the shape forward from behind while slightly closing card to crease the shape down the middle. For gift card, attach ribbon. Glue all cards into a larger prefolded backing.


The Holly Card


 Make these early enought and send them not just for xmas cards but also DIY GLITTERED XMAS CARDS WITH FOLD IN SHAPES AND A HOLLY CARD!


A sprig of holly springs to life from atop a store-bought plain note card. This project wouldn't fare well in the mail, so save it for greetings you're planning to deliver by hand.


Tools and Materials:
Holly Card How-To:1. Draw a holly leaf on cardboard to make a template; cut out.
2. Trace template onto card stock in different shades of green to make eight leaves; cut out with a utility knife.
3. Using a ruler and a bone folder, score each leaf down its center, as shown; lightly fold sides upward along the scored line. Bend the top of each leaf away from its stem.
4. Punch berries from red card stock using a hole punch.
5. Cut a branch from brown card stock. Affix branch to a store-bought note card with craft glue; let dry. Add leaves, gluing only at the stems. Top with berries along branch.